Topaz Labs sent me their software for review, and I have been using it for a few months. I can honestly say that it has been a real highlight for me when having to use Photoshop to clean up an image. The thing I like most about Topaz Lens Effects plug-in is that it is very intuitive.
Obviously geared for photographers, it gives me access to all of the tools that I might jump for in my camera bag while out on location - plus a bunch I would never think of. There are 29 filter packets in total that come with the software. Neutral Density Filters, Graduated Color Filters, Reflectors, Warming Filters, UV Haze Filters, Dual Tone Filters, even a Polarizing Filter.
The long and short of it is that Topaz Lens Effects has every single goody that you can think of to spruce up your image - in a way that photographers think of. You do not need to be a computer graphics person to figure out how to use them. Each filter effect is customizable, meaning that you can be as light or as strong as you want to be when post processing.
So, can I throw out my filters and just make perfect post-processed images? Well, maybe for some. However, one thing to remember is that you can not create image detail where there was none before. If you lost your highlights when shooting the image, or your shadows are too mushy, you can fix some of that - but that is all it is. A fix. A comb-over if you like.
I believe strongly that getting the image as close to perfect as possible in camera is still a necessity. For me, having the right filter in the field at the right time is going to continue to be a must. Adding these post processing options to a well exposed image opens a wealth of creative opportunities that might not have existed prior - particularly if you are someone like me who is not the most proficient Photoshop person on the planet.
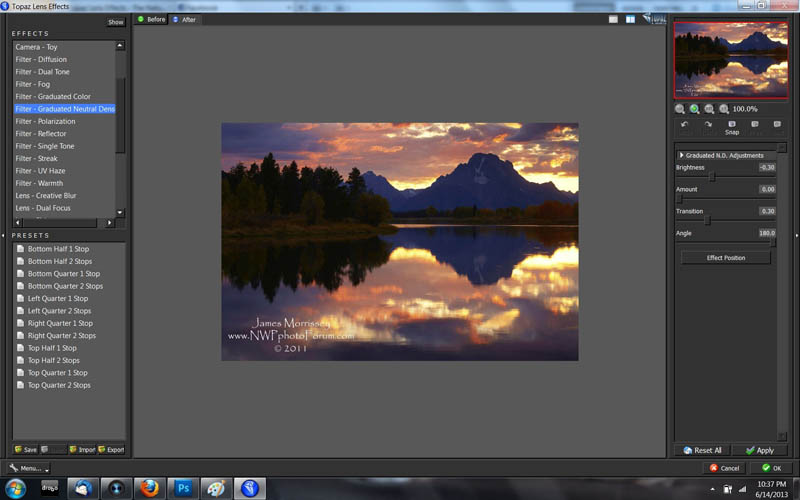
As an example, I have picked one one of my favorite images from two years ago. It is an image that I was very pleased with when I took - having used a Singh Ray 2 Stop ND Grad to hold off the background light and get some detail in the shadow zones. This shot is of Mt. Moran at sunset from Oxbow Bend. The type of filter is listed as the 'Effect' above. The Presets are in the box below. On the right toolbar are the adjustment tools that are allowed.
As you can see, there is a ton of customization available. I have gone out of my way to be a soft touch. Just because you CAN do something in Photoshop does not mean you SHOULD do something in photoshop.
The first tool that we are looking at is the Lens Effects Graduated ND Filter. In this case, I just slightly darkened the bottom half of the image about 1 stop. The tool allows you to actually do more than hold light back. It will also allow you to brighten up the area that you are attempting to alter.
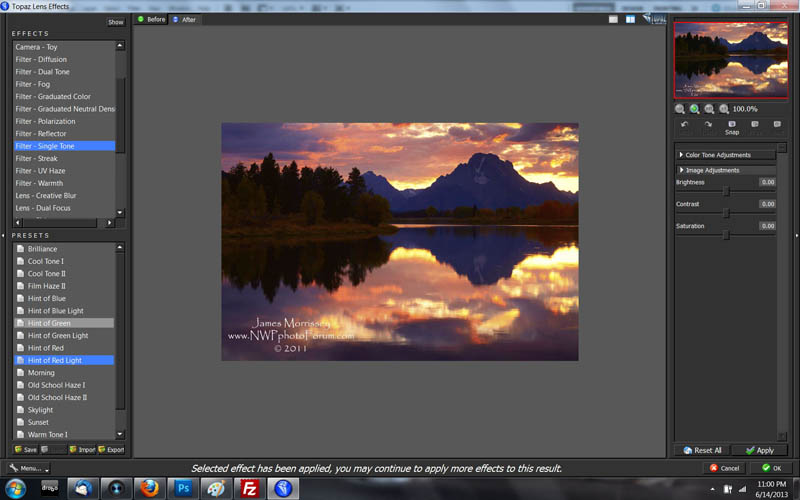
In this next tool, we are using a Single Tone Filter. As you can see, you can add pretty much any color you want. I have added a 'hint of red.' Again, using the filter combination, I have tried very hard to restrain myself from doing anything too severe with the shot. However, there are a whole host of options (including adding a morning mist) which allow you to be as heavy handed as you want.
The long and the short of it is that using Lens Effects has made my photographic post-processing life so much easier. It is a great product worth every cent. Kudos to the folks at Topaz Labs. While I cannot throw out my Singh Rays, they sure have made it much easier to help me fix up my images for presentation.
Check out their website:
www.topazlabs.com

